How to Hide Email Addresses in Outlook: Step by Step
Learn how to hide email addresses in Outlook with Bcc, distribution lists and mail merge, and see when each method stops working.
You've finished the neighborhood meeting notice, pasted in the mailing list, and paused over Send. Everyone needs the update, but they don't need everyone else's personal email address. You also know someone will reply with a question that the whole group ought to see.
Learning how to hide email addresses in Outlook starts with Bcc. Choosing whether to keep using it depends on what happens after you send: a private announcement and an ongoing group conversation need different setups.
Table of Contents
- Which Method Hides Addresses in Outlook
- How to Send a Hidden-Recipient Email in Outlook
- Send Personalized Emails with Mail Merge
- Mistakes and Where Bcc Breaks Down
- Set Up a Group Address for Ongoing Conversations
Which Method Hides Addresses in Outlook
Are you sending a single notice, repeating announcements to the same people, personalizing individual messages, or running a discussion? Choose the method by who should see the recipients and who should receive replies, not just by how many addresses you have.
Bcc, short for blind carbon copy, is Outlook's basic address-hiding control. Microsoft's Bcc guidance explains that Bcc recipients receive the message without other recipients seeing their inclusion, but they don't receive replies from other hidden recipients.
Hiding methods compared by situation
| Situation | Method | Hides addresses | Replies reach whole group | |---|---|---|---| | One-time announcement | Bcc with your own address in To | Yes | No, replies go to you only | | Same list, repeated announcements | Personal distribution list in Bcc | Yes | No, replies go to you only | | Personalized message to each person | Mail merge from a spreadsheet | Yes | No, each reply comes to you | | Ongoing two-way discussion | Group address from a list service | Yes, with address-hiding controls enabled | Yes, with replies configured for the group |
A personal distribution list, also called a contact group in classic Outlook, saves you from typing the same addresses repeatedly. It's still a collection of contacts in your mailbox, not a separate discussion service. Microsoft's instructions for hiding a personal distribution list specify putting your address in To and the list in Bcc.
If the fields are unfamiliar, this explanation of Cc versus Bcc helps distinguish visible copying from hidden delivery. Neither field protects your account from malicious messages; for that separate task, Tech Today offers guidance to stop phishing attacks in your inbox.
Choose by the job
- A standalone notice: Use Bcc when recipients don't need a shared discussion.
- Recurring updates: Save a personal distribution list and place it in Bcc.
- Individual details: Use mail merge for personalized messages.
- Continuing discussion: Use a private group address when membership, replies, and leadership handoffs matter.
Our group members don't need to create an account; they receive and reply to emails as they normally do. Our policy is that members' emails are never shared or sold.
If you'd be sorry to lose the conversation when you step down, you need a group address, not a Bcc list.
How to Send a Hidden-Recipient Email in Outlook
Start with a new message rather than forwarding an old announcement. An old message can carry visible addresses in its quoted text even when you've correctly filled in Bcc.
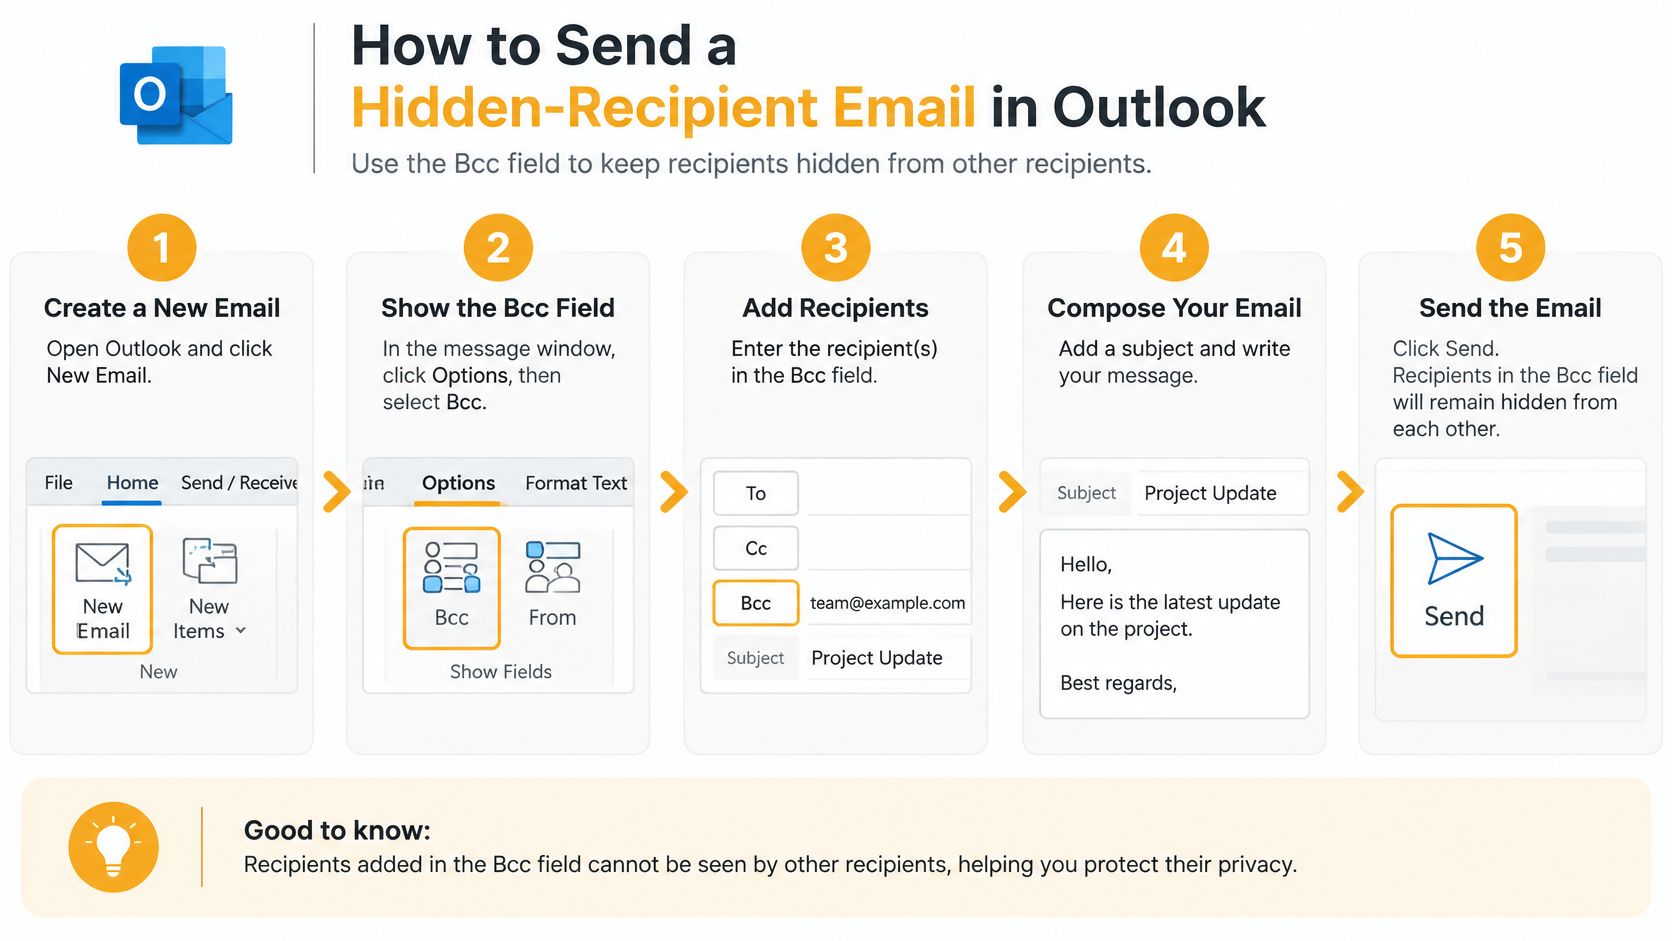
Use this visual guide to check the basic sending sequence.
Set up and check the message
-
Open New Email and display Bcc. In new Outlook, choose Options → Show fields → Bcc. In classic Outlook, choose Options → Bcc; older layouts may place the control under Message Options.
-
Put your own email address in To. Leave Cc empty unless you deliberately want someone's address to be visible. Your address provides a clear visible destination without publishing the membership list.
-
Add recipients to Bcc. Type their addresses or select your saved personal distribution list. After Outlook resolves the entries, inspect the recipient fields rather than assuming the addresses landed where you intended.
-
Write a greeting that makes sense without a visible list. Use something like “Hello garden club members” instead of referring to the people copied above. Explain whether you want a private response, especially for attendance, accessibility, or personal circumstances.
-
Test the received message before sending the announcement. Use external accounts you control, then open each received message's recipient details or message headers. Confirm that neither test recipient can see the other, and check that the body and attachments don't contain the list.
-
Send the checked announcement. Keep any responses that need follow-up organized in your mailbox. Before forwarding an answer, remove unnecessary signatures, quoted addresses, and personal details, and confirm the person intended their answer to be shared.
Microsoft's Outlook instructions document the Bcc controls and explain the distinction between visible and hidden recipients. Menu labels can differ, but the essential check is always the same: the membership list belongs in Bcc, not To or Cc.
For a demonstration of the Outlook workflow, use the video below.
Save a reusable contact group
In classic Outlook, open People → New Contact Group, give the group a recognizable name, and select Add Members. Choose existing contacts or enter email addresses, then select Save & Close.
In newer Outlook interfaces, look in People for New contact list, sometimes under the New contact menu. Don't confuse a personal contact list with a shared group: saving contacts doesn't create shared ownership or change how messages are delivered.
Use a descriptive name such as Neighborhood Notices rather than something vague like Email List. When you select it in a message, check that Outlook has placed the group in Bcc before continuing.
Pre-send check: Inspect the recipient fields, the quoted message, and every attachment. Bcc can't hide an address you've pasted into the body.
A successful announcement arrives with your address visible and no other hidden recipients displayed. Check the received copy, not just your Sent Items view, because you as the sender can still inspect whom you included.
Send Personalized Emails with Mail Merge
-
Prepare the spreadsheet. Use a separate row for each recipient, with clearly labeled columns such as Email and FirstName. Validate the addresses, remove duplicates, and exclude people who shouldn't receive the message.
-
Start the merge in Word. Choose Mailings → Start Mail Merge → E-mail Messages. Write the message as an individual email, not as an announcement referring to a hidden group.
-
Connect the recipient file. Select Select Recipients → Use an Existing List, then choose your spreadsheet and the appropriate worksheet. Inspect the selected records before proceeding so you don't accidentally include an old worksheet or filtered-out contacts.
-
Insert only necessary merge fields. A first name may be useful; internal notes about payments, health, or membership disputes aren't. Keep sensitive working information out of the merge source wherever possible.
-
Preview the actual records. Select Preview Results and move through entries with different name lengths, blank fields, and unusual characters. Confirm that each greeting belongs to the email address in the same row.
-
Run a small pilot before sending the full list. Use Finish & Merge → Send E-mail Messages, select the email-address column in the To control, and enter the subject. Review the pilot messages before sending the remaining records.
What the recipient sees
Mail merge creates separately addressed messages, rather than hiding a list inside a shared transmission. That makes it useful for membership reminders, individual appointment details, or volunteer assignments where the wording changes by recipient.
The reply returns to the sending mailbox. Don't use mail merge for a planning discussion in which members need to compare suggestions, because each recipient has an individual exchange with the organizer.
Before starting, confirm that your Word and Outlook installation supports the email-merge workflow. If the sending command isn't available, resolve that compatibility issue before preparing a live mailing.
Catch the spreadsheet mistakes
- Stale addresses: Confirm questionable entries with the member rather than repeatedly resending to an address that bounces.
- Duplicate rows: Remove repeated recipients so they don't receive repeated copies.
- Wrong fields: Check the finished wording, not just the column headings, for accidentally merged personal information.
- Unchecked selection: Review which records are selected before the final send.
Store the spreadsheet in a restricted folder rather than a broadly shared club drive. Delete temporary exports after the mailing when they're no longer needed, while keeping the authorized membership record under the organization's retention practices.
Calendar invitations need a different control. Microsoft documents Hide attendee list under Response options in its guidance on hiding meeting attendees. Don't assume that a technique used for ordinary email automatically conceals the attendee list on a meeting request; check the invitation controls and test the received invitation separately.
Mistakes and Where Bcc Breaks Down
The easiest disclosure to make is also the easiest to recognize afterward: the entire list sits in To or Cc, where every recipient can copy it. A saved contact group doesn't prevent that mistake if you select it in the wrong field.
Australia's Office of the Australian Information Commissioner recorded 13 data-breach notifications caused by failure to use BCC in July–December 2024, with a median of 47 affected individuals. Those figures describe notified Australian incidents, not the likelihood of a breach in your club, but they show why checking the header matters.
Common mistakes, what they expose and the fix
| Mistake | What it exposes | Fix | |---|---|---| | List pasted into To or Cc | Every address in the visible header | Move the list to Bcc and put your address in To | | Copying addresses into a new message by hand | Addresses reappear in visible fields | Paste addresses only into Bcc | | Replying to all on a Bcc message | Hidden recipients receive no reply, and visible addresses can spread | Reply to the sender, then forward what the group needs | | Sending without a test | Unchecked header exposure | Send to external test accounts and check the headers | | Stale or duplicate spreadsheet rows | Wrong people may receive the message, and duplicate entries receive extra copies | Clean the list and restrict who can open it |
Reply All doesn't reveal the hidden list automatically. The trap is assuming it includes everyone: it can reach visible recipients, but it can't reconstruct the Bcc membership. A hidden recipient who replies also identifies themselves to whoever receives that reply.
The organizer becomes the relay
For announcement-only email, Bcc is enough. For private replies to the organizer, it also works, provided someone has responsibility for answering and recording decisions.
For replies everyone needs, the organizer must decide what to forward, remove private details, and resend it to the correct current membership. Microsoft's personal distribution-list guidance addresses hiding names and addresses, but that outgoing-message procedure isn't a shared conversation workflow.
Say a volunteer asks whether the event location has changed. If the answer stays in your private exchange, other volunteers may keep working from the original notice. Maintaining a coherent thread of emails requires more than concealing the recipient field.
With our shared-list approach, members receive messages sent to the group's single address, and replies go back to the group. The list stays available when a board member moves away because it doesn't live in anyone's inbox.
Bcc also doesn't conceal delivery metadata from mail servers, administrators, or security gateways. Address hiding isn't complete anonymity, and no header setting stops someone from sharing message content.
A small group that only needs an occasional notice doesn't need a new service. Use Bcc carefully and keep the process simple.
Set Up a Group Address for Ongoing Conversations
Choose a group address when members need to answer each other without asking the organizer to circulate every response. The goal isn't merely faster sending; it's a conversation that remains usable when members join, leave, or take over organizing.
Build the list around the group
-
Choose the service and check its limits. Confirm the allowed membership, list capacity, posting controls, and reply behavior before moving your contacts. A service suitable for announcements may not support private group discussion in the way you need.
-
Create a recognizable list name and address. Use the organization or activity name rather than the current organizer's name. Members should recognize the destination when they write a new message in Outlook.
-
Clean and import the existing membership. Remove invalid addresses and duplicate entries first, and confirm that everyone has agreed to participate. Use a controlled spreadsheet export rather than copying contacts from an old message header.
-
Explain how participation works. Tell members which address to use for group business and which address to use for a private question. Make clear that a reply intended for the group must not contain information meant only for the organizer.
-
Test both delivery and replies. Send from a member's account, then have another member reply. Check that the intended members receive both messages and that personal addresses remain hidden in the received headers.
-
Assign membership management and document the handoff. Decide who approves additions, handles removals, and can take over administration. Record the process somewhere the next organizer can access without using your personal mailbox.
For the Outlook side of that decision, use this guide to setting up an email list in Outlook. Keep the distinction clear between a personal collection of contacts and a managed group destination.
Verify privacy before inviting everyone
Enable the service's member-address privacy controls and inspect a received message, including the sender details and Reply-To behavior. Don't assume every list service hides personal addresses by default, or that concealing the membership directory also conceals message headers.
Our participation rules require explicit consent from every recipient, and every email sent through our service must include clear unsubscribe instructions. Importing an address book isn't a substitute for permission to email its contacts.
Keep private matters outside the group discussion, even when addresses are hidden. A member can still forward a message or copy its contents.
The deciding test is practical: if you'd be sorry to lose the conversation when you step down, use a group address. If you only need to deliver a notice, stick with the simpler tool.
Listava offers a shared group email address that keeps personal addresses hidden while letting replies reach the group. Visit Listava if your Outlook Bcc list has become a discussion you're forwarding by hand, and set up a group destination your next organizer can keep using.